Setup BeamXR Package
This is our core package, designed to have minimal impact on your project. It has very few special requirements and should quite happily sit alongside your current work.
Installing the Package
You can install the BeamXR Package with one of the following methods
BeamXR Package Download
Git URL Install
Note that this method requires you to have Git installed on your system
- Open the Unity Package Manager (
Window > Package Manager) - Click the plus in the top left and select
Add package from git URL... - Copy and paste
https://github.com/BeamXR-io/io.beamxr.unity.streaming.gitinto the URL box, make sure to include.giton the end otherwise it will fail - Press
Addand wait for Unity to import the package
Package From Disk Install
- Download the Package from Github and extract it
- Open the Unity Package Manager (
Window > Package Manager) - Click the plus in the top left and select
Add package from disk... - Locate the BeamXR Streaming package on your drive and click the package.json file
- Press open and wait as Unity imports the package
You can reference the package with a relative path by modifying the manifest.json file within your project's Packages folder.
Embedded Install
Download the Package from Github and simply extract the zip file into the Packages folder of your Unity project.
Unity will automatically find the package and install it as necessary.
Beam Settings
The Beam Settings file is the centralised area for your project's BeamXR settings. It can be accessed via Edit > Project Settings > BeamXR. It will generate a BeamXRSettings file in your asset's Settings folder.
You will need to add your Experience Key and Experience Secret, from the account setup process, to your Beam Settings before you can start streaming or recording.
Other settings can be changed later, but these are the minimum required to get started. Further information can be found at the dedicated Beam Settings page.
Adding Scene Prefabs
When the package is installed, you will see a new BeamXR menu in your Unity window.
You can quickly add the required prefabs to your scene by navigating to BeamXR > Prefabs > Core > Add BeamXR
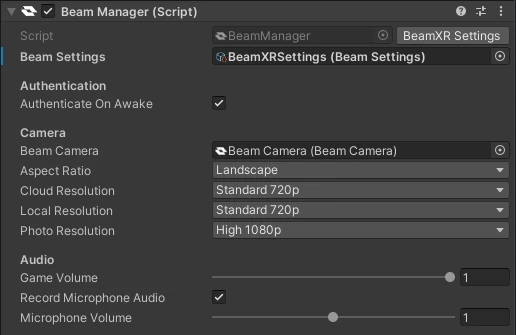
This will add both the Beam Manager and Beam Camera to your scene. Both of these are the bare minimum required for using BeamXR.
Beam Manager Setup
The Beam Manager is the heart of the BeamXR system. It controls everything from starting streams and recordings, to reporting statuses, to account authentication.

The Beam Manager is bundled alongside a BeamUnityEvents script, which should provide every type of event you should need within your game. It is highly recommended to subscribe to these events, instead of repeatedly polling the manager.
For a more detailed overview and explanation of the Beam Manager, please refer to it's dedicated page. SDK Guides > Core > Beam Manager
Audio
By default Beam will use the built in Unity Audio system. If you are using a third party solution such as Wwise or FMOD, please see our Third Party Audio instructions.
Beam Camera Setup
The Beam Camera controls the rendering and output of your project. It only renders when requested for performance reasons, and will render at the frame rate specified in the Beam Manager.
For a more detailed overview and explanation of the Camera Settings, Camera Presets, and other camera features, please refer to the Beam Camera and Camera Settings and Presets pages.
Your First Stream
Now that you've got everything else sorted, you're ready to hop into play mode and try streaming!
If you only plan to use the local recording and photo features, you can skip this step entirely
Navigate back to your Beam Manager. The first time you enter play mode, you will be asked to sign into your BeamXR account. To do this you can simply follow the instructions in the inspector to open your browser window. This is done per device/player and the details are stored between play modes.
Your device flow code will also be logged to the Unity console. You can use this to test in builds, without having to initially build or implement a login interface.
The same authorisation steps are required by your players. You can provide a quick access URL that works with the headset's built in web browser by accessing the BeamStreamingManager.Instance.DeviceFlowCode.VerificationUrlComplete
Once you are logged in, you can simply press the Start Streaming button to start your stream!
Your First Recording
Recording can be done in two ways, either locally or when streaming.
When you enter play mode, as long as your have assigned your Experience Key and Experience Secret, you can press the Start Local Recording or Take Photo button.
If you start a stream, you can then do the same but by pressing the Start Cloud Recording option.
...and it's as simple as that! If you're looking for a more feature rich experience, continue on to the next page to learn about the Director Kit!